
Cracking OverTheWire Bandit (Levels 9–15): Decoding Data, Unpacking Layers and Talking to Servers
OverTheWire Walkthroughs — Part 2 of 3
In Part 1, I worked through Bandit Levels 0–8: connecting over SSH, handling awkward filenames, finding hidden files, and searching with find, grep and pipes. Those levels were mostly about finding things.
The next set of levels felt different. Instead of hunting for a file, I was often staring at data that had been disguised, squashed into layers, or locked behind a network connection. The question changed from “where is the password?” to “what shape is the password hiding in, and how do I turn it back into plain text?”
As before, I focused on understanding each challenge rather than memorising commands. In this article I'll also explain every idea in plain language, the way I would explain it to someone who has never opened a terminal.
A quick note: I have deliberately left every password out of this article just like I did in part 1. OverTheWire asks players not to spoil the answers, and the real prize is learning the method. Everything below is technique, not solution.
Instead of treating the seven levels as unrelated puzzles, I've grouped them into three themes:
- Making Sense of Messy and Disguised Data — Levels 9–11
- Unwrapping Layers and Using Keys — Levels 12–13
- Talking to Servers Over the Network — Levels 14–15
Let's get into it.
Theme 1: Making Sense of Messy and Disguised Data (Levels 9–11)
These three levels shared one setup: the password was inside a file called data.txt, but the file was not easy to read. The skill was recognizing how the data had been disguised and choosing the tool that undoes that disguise.
Level 9 → Level 10: Finding Words Hidden in Garbage
The password was somewhere inside data.txt, in one of the few human-readable strings, right after several = characters.
The file was mostly unreadable symbols, so printing it with cat would only flood the screen with nonsense.
Think of it like this: Imagine a beach covered in thousands of pebbles, and only a few have words painted on them. strings is a helper who walks the beach, picks up only the pebbles with writing, and lines them up for you.
I used:
strings data.txt | grep "==="
Here's what each part does:
strings data.txtpulls out every run of readable text (by default, four or more printable characters in a row) from a file full of unreadable data.|hands that list to the next command.grep "==="keeps only the lines that contain three equals signs in a row, which matches the clue about “several=characters.”
The output can still contain a few stray symbols, because random bytes sometimes look like text by accident. The line I wanted was the one with a long run of = followed by the password.
What I learned: strings is a quick way to peek inside files that were never meant to be read as text, such as programs and unknown binaries. Pairing it with grep turns a flood of output into a single useful line.
Level 10 → Level 11: Base64 Is a Costume, Not a Lock
This time data.txt contained base64-encoded data.
Base64 is a way of writing any data using only 64 plain characters: letters, numbers, + and /. It exists so that data can travel through systems that only handle text, such as email.
Think of it like this: Base64 is like writing your message in a different alphabet. Anyone who knows the alphabet can read it. There is no secret key, so it isn't a lock. It's a costume.
A tiny example:
echo "Hello" | base64
# SGVsbG8K

echo "SGVsbG8K" | base64 -d
# Hello
For the level, I used:
base64 -d data.txt
base64calls the tool that handles this format.-dtells it to decode, meaning turn the costume back into the original message.
There's an important security idea hiding here. Encoding changes the format of data so it's easier to carry around. Encryption protects the data with a key. Base64 is encoding, so it protects nothing. You'll see it all the time in real systems, which is exactly why it's worth recognising on sight.
What I learned: Encoded is not the same as encrypted. If a secret is only base64-encoded, anyone can read it with one command.
Level 11 → Level 12: The Letter-Shifting Trick (ROT13)
In this level, every letter in data.txt had been rotated by 13 positions.
That is a cipher called ROT13. Each letter moves 13 places forward in the alphabet, and letters at the end wrap back around to the start, so A becomes N and N becomes A.
Think of it like this: Picture a clock with 26 numbers instead of 12. Moving 13 steps takes you to the exact opposite side. Move 13 more steps and you're home again. That's why the same command both scrambles and unscrambles a message.
A tiny example:
echo "Hello" | tr 'A-Za-z' 'N-ZA-Mn-za-m'
# Uryyb
For the level, I used:
cat data.txt | tr 'A-Za-z' 'N-ZA-Mn-za-m'
tr(short for translate) swaps characters one-for-one.'A-Za-z'is the set of letters to replace: all uppercase, then all lowercase.'N-ZA-Mn-za-m'is what to replace them with, position by position. The firstAbecomes the firstN,BbecomesO, and so on, with the end of the alphabet wrapping around toA–M.
Numbers and punctuation don't change, because they aren't in the sets.
There's also a shorter way to write it. The < symbol feeds a file straight into a command, so cat isn't needed:
tr 'A-Za-z' 'N-ZA-Mn-za-m' < data.txt
What I learned: ROT13 is obfuscation, not encryption. It's a Caesar-style cipher with one fixed shift, so it can be broken in seconds and should never protect anything that matters. tr is a handy little tool for character-by-character swaps.
Theme 2: Unwrapping Layers and Using Keys (Levels 12–13)
These two levels were about handling things carefully: setting up a safe workspace, peeling a file apart layer by layer, and then switching from passwords to keys.
Level 12 → Level 13: The Nesting-Doll File
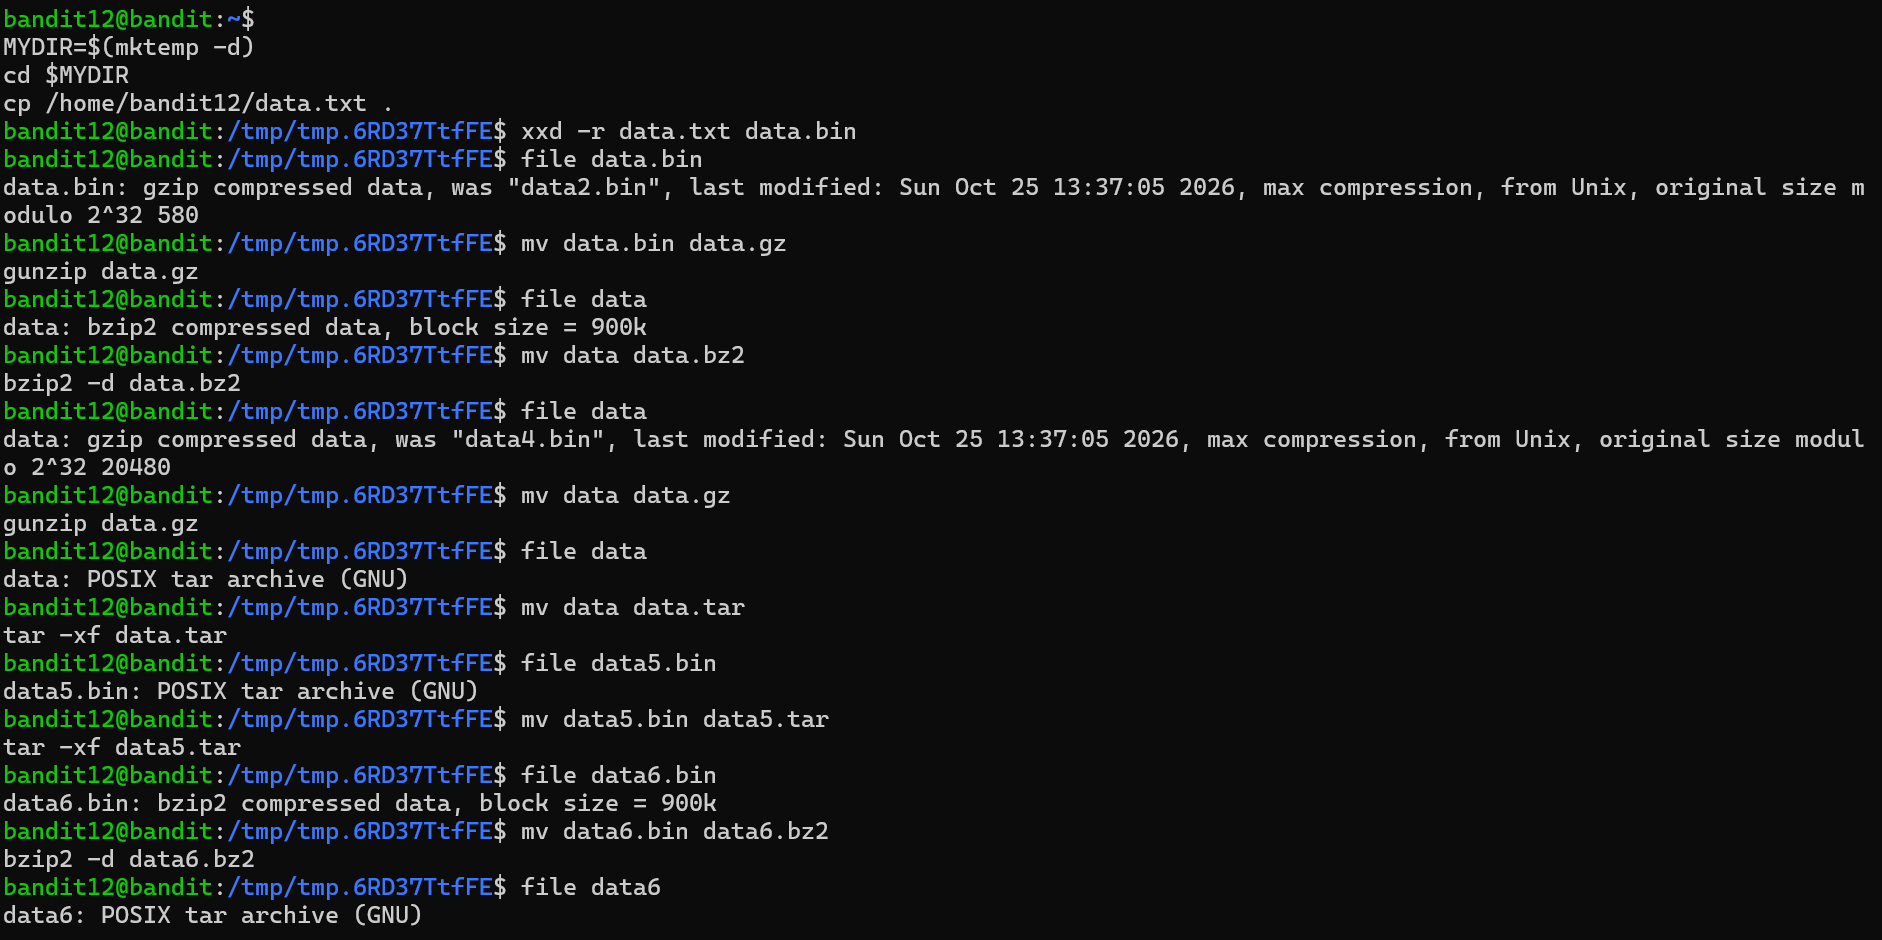
The password was inside a file that was a hexdump of data that had been compressed again and again. The level suggested working in a temporary folder under /tmp.
That sentence contains three ideas, so let's take them one at a time.
1. Hexdump. Computers store everything as bytes. A hexdump writes each byte as two characters in hexadecimal (base 16), so a file of binary data becomes a long page of ordinary-looking text. For example, the word Hello becomes:
| Character | H | e | l | l | o |
|---|---|---|---|---|---|
| Hex | 48 | 65 | 6c | 6c | 6f |
The tool xxd creates hexdumps, and xxd -r reverses them, turning the text back into the original binary file.
2. Layers. Think of it like this: a set of Russian nesting dolls. Each doll hides another doll inside, and you have to open them one at a time. Here, each “doll” was a compressed file wrapped inside another compressed file. The file command is like an X-ray that tells you what kind of wrapping is on the outside right now.
3. A safe workspace. I couldn't create new files in my home directory on this server, and I needed room to unpack things. The /tmp folder is a shared scratch area that everyone can write to. Because many players share it, I used mktemp -d to create a folder with a random name that nobody else would be using.
Here is the process I followed.
Step 1: Build a private workspace and remember where it is.
MYDIR=$(mktemp -d)
mktemp -d creates a new directory with a random name (something like /tmp/tmp.9iX3pY42E2) and prints its path. $(...) captures that printed path, and MYDIR= saves it into a variable, which you can picture as a labelled box holding the long name so I don't have to type it again.
Step 2: Copy the file in, then move in.
cp data.txt $MYDIR/
cd $MYDIR
Working on a copy means the original stays untouched if I make a mistake.
Step 3: Turn the hexdump back into a real file.
xxd -r data.txt > datafile
The > symbol sends the output into a new file called datafile.
Step 4: Ask the file what it is.
file datafile
It told me what kind of compression I was dealing with.
Step 5: Unwrap, check, repeat. Each layer has its own tool:
file says |
Rename it to | Unpack it with |
|---|---|---|
| gzip compressed data | datafile.gz |
gunzip datafile.gz |
| bzip2 compressed data | datafile.bz2 |
bzip2 -d datafile.bz2 |
| POSIX tar archive | datafile.tar |
tar -xf datafile.tar |
I renamed each file with mv before unpacking, for example:
mv datafile datafile.gz
gunzip datafile.gz
The rename matters. gunzip refuses a file that doesn't end in .gz, and bzip2 will still unpack a file without the .bz2 ending, but it saves the result under a made-up .out name. Renaming first keeps both tools happy.
After every unpacking step, I ran file again, because the layers repeat and can come in different orders. I kept going until file finally reported plain ASCII text, then read that last file with cat.
What I learned: Never assume what a file is. Check, act, then check again. Working on a copy inside a throwaway folder keeps your original data safe, and file is the compass for the whole journey.
Level 13 → Level 14: Keys Instead of Passwords
This level changed the rules: there was no password to find. Instead, I was given a private SSH key that would let me log in as the next user. The next password lived in a file that only that user could read.
Think of it like this: A password is a secret word you say at the door, and anyone who overhears it can use it. An SSH key pair is more like a one-of-a-kind key and its matching lock. The server holds the lock (the public key). You keep the key (the private key). To log in, your computer proves it holds the matching key without ever handing the key over.
That's also why the file was protected: only bandit14 could read the password file, so I had to become bandit14.
My first plan was to log in from inside the server. The server wouldn't allow that connection to itself, and pasting the key into a file by hand ran into permission errors. The fix was to bring the key to my own computer and connect from there. In my local PowerShell terminal, I copied the key with scp:
scp -P 2220 bandit13@bandit.labs.overthewire.org:sshkey.private .
scpis secure copy, a way to copy files over an SSH connection.-P 2220is the port. Notice that it's a capital P forscp, whilesshuses a lowercase-p. It's an easy mistake to make.bandit13@bandit.labs.overthewire.org:sshkey.privatereads as user @ host : file to fetch..means “put it right here, in my current folder”, the same.from Part 1.
Then I logged in with the key:
ssh -i sshkey.private bandit14@bandit.labs.overthewire.org -p 2220
-i stands for identity file. It tells SSH which key to show at the door.
If SSH ever complains that a key file's permissions are “too open”, it's protecting you. A private key should be readable only by you. On Linux or macOS, chmod 600 sshkey.private fixes it; on Windows, restrict the file to your own user in its security settings.
Once I was logged in as bandit14, the protected file became readable:
cat /etc/bandit_pass/bandit14
What I learned: Real servers use keys all the time, and the private half must be guarded like a house key. It should never be shared, emailed, or uploaded to public places such as GitHub. I also learned that sometimes the smart fix is to change where you work, not how.
Theme 3: Talking to Servers Over the Network (Levels 14–15)
This is where the networking fundamentals I studied before starting Bandit really paid off. Ideas like ports, localhost and encrypted connections stopped being theory and became commands I could type.
Level 14 → Level 15: Knocking on a Port with Netcat
The task: send the current level's password to port 30000 on localhost, and the server would reply with the next password.
Two ideas to unpack:
localhostmeans this very computer. A machine can connect to itself, andlocalhostis the name for that.- A port is a numbered door on a computer. Many programs run on one machine, and each listens at its own door. Port 30000 had a little program waiting behind it that checks passwords.
Think of it like this: A big building has thousands of numbered doors, and each door has a different helper behind it. nc (short for netcat) lets you walk up to a door, knock, and talk to the helper directly.
I used:
nc localhost 30000
Once the connection opened, I pasted the current password and pressed Enter. The server instantly replied with the next password.
There's also a way to skip the copy-and-paste by sending the password straight from its file:
cat /etc/bandit_pass/bandit14 | nc localhost 30000
One thing to notice: nc sends everything as plain text. Anyone watching the connection could read it. That's the problem the next level solves.
What I learned: nc is a simple way to talk to any network service by hand. Ports are numbered doors, and localhost lets a computer knock on its own.
Level 15 → Level 16: Sending a Secret in a Sealed Envelope (SSL/TLS)
The next task looked the same, with one change: send the password to port 30001 using SSL/TLS encryption.
Think of it like this: The last level was like sending a postcard. Everyone who handles it can read it. TLS is a sealed envelope. Before the two sides start talking, they do a handshake to agree on how to scramble their messages, and from then on only they can read what's inside. SSL is the older name; TLS is the modern version, though people often still say “SSL.” It's the same technology behind the padlock in your browser's address bar.
Plain nc can't do that handshake. openssl s_client can:
openssl s_client -connect localhost:30001 -ign_eof
openssl s_clientis a client that speaks TLS.-connect localhost:30001is the host and port to connect to.-ign_eofkeeps the connection open even when my input runs out, so the server still has time to send its reply back. Without it, the client may hang up before the answer arrives.
First, I displayed the current level's password so I could copy it:
cat /etc/bandit_pass/bandit15
Then I opened the secure connection. A long block of handshake and certificate details scrolled by. That's normal. It's the two sides setting up the sealed envelope. Once it finished, I pasted the password, pressed Enter, and the server returned the next password.
The same job can also be done in one line by sending the password through a pipe:
cat /etc/bandit_pass/bandit15 | openssl s_client -connect localhost:30001 -ign_eof
What I learned: Encryption in transit is what separates a postcard from a sealed envelope. Tools like openssl s_client also let you test and inspect secure connections by hand, which is a very useful skill.
Key Takeaways: What Levels 9–15 Taught Me
These levels showed me that the command line is also about recognising how data is disguised and picking the matching tool to undo it.
Here are some of the commands and concepts I became more familiar with:
| Command / Concept | What I used it for |
|---|---|
strings |
Pulling readable text out of messy or binary data. |
base64 -d |
Decoding base64 text back to its original form. |
tr |
Swapping characters one-for-one (used for ROT13). |
xxd -r |
Turning a hexdump back into the original binary file. |
file |
Identifying a file's real type before acting on it. |
mktemp -d |
Creating a private, randomly named workspace in /tmp. |
gunzip, bzip2 -d, tar -xf |
Unpacking gzip, bzip2 and tar layers. |
scp |
Copying a file between my computer and the server. |
ssh -i |
Logging in with a private key instead of a password. |
nc |
Talking to a port in plain text. |
openssl s_client |
Talking to a port over an encrypted TLS connection. |
| Encoding vs encryption | Base64 and ROT13 change how data looks, but they don't protect it. |
A pattern I noticed across all seven levels:
- Look at what the data actually is, using
fileorstrings, instead of guessing. - Name the disguise: is it noise, an encoding, a shifted alphabet, a stack of layers, or something locked behind permissions or a network port?
- Pick the tool made for that disguise.
- Check the result after every step.
- Repeat until it's plain, readable text.
Final Thoughts
Levels 0–8 taught me how to find things. Levels 9–15 taught me how to recognise a disguise and undo it, and how to talk to services over a network, first in plain text and then in a sealed envelope.
Three ideas stayed with me beyond the commands:
- Encoding and obfuscation are not security. Base64 and ROT13 can be undone in one line.
- Private keys must stay private. The key is the identity.
- Encrypted connections matter. The difference between
ncandopenssl s_clientis the difference between a postcard and a sealed envelope.
The most valuable lesson for me is this: don't guess, identify. A quick file or strings often told me more than any amount of trial and error.
In the next and final part of this series, I'll continue from Bandit Level 16.
Until then, keep exploring, keep experimenting, and keep learning.
Challenge platform: OverTheWire — Bandit
This is Part 2 of my three-part OverTheWire walkthrough series.
About the author
- Computer Science graduate documenting a practical transition into infrastructure security and defensive operations. Driven by natural curiosity and a passion for deep-dive security research, I focus on analyzing vulnerabilities to help keep systems and organizations cyber-safe. Publishing hands-on labs, command-line analytics, and technical logs backed by verifiable proof of work.
Comments
Join the discussionNo comments yet. Be the first to comment.
OverTheWire: Bandit Walkthroughs
A chronological log documenting Linux command line mastery, file permissions and system security fundamentals.